• Overview
• Move files to the Legal Hold area
• Finding files in Legal Hold storage
• Restore files from the Legal Hold area
• Tracking Auditing Legal Hold Files
• Activate the Legal Hold File Lock Feature
• Check the Audit Trail for a Locked File
The Worldox Legal Hold feature is a simple but effective tool for moving files into temporary or permanent storage.
Whereas Worldox Archives are retention rule-based - offering the ability to automatically archive tagged files - the Legal Hold feature is entirely manual. You decide on a file-by-file basis which documents move to Legal Hold folders, and when they should be restored to active folders.
Note: For Legal Hold purposes, the need to segregate files is not time or life-cycle based. That lets out archiving retention rules, which are strictly time-based. Manual moves to Legal Hold folders are the answer. Files can be restored from Legal Hold as needed. Until then, they are completely separate from active files, accessible only to those granted specific access rights.
Depending on your user rights and entitlements, you may be able to move files to the Legal Hold area, browse/search for stored files and restore files from the Legal Hold area.
Two new audit events have been added in GX3 for Legal Hold:
• Legal Hold add
• Legal Hold undo
This means you can audit files, run audit queries and produce audit reports to prove which files were stored in Legal Hold, and for how long.
Note: The Legal Hold feature has to be enabled at your site before Legal Hold folders can be seen and searched. If you expect to see Legal Hold folders in the left-side navigation panel and do not, please contact the person who administers Worldox at your site. Or, contact Worldox Tech Support.
The Worldox Legal Hold feature provides functions common to that process. All legal hold projects are different and have a variety of considerations and issues inherent in them. As such, the software merely provides functions of common issues and considerations, but does not address all potential legal issues. This feature is offered with the understanding that it does not in writing or implied offer any guarantee of compliance, or is offering any legal advice or services with respect to specific facts or circumstances of this function. Laws and standards are constantly changing, and each procedure, law, regulation, rule or standard should be checked for its compliance in the jurisdiction under which it falls.
To manually move documents to Legal Hold storage:
Use the left-side navigation panel, search or other tools to find the worklist you need.
Highlight (select) the file(s) you want to move to storage in any active worklist.
Note: You can store multiple files at once. If you select more than one, Worldox asks you to confirm your selection, in the Clarify Selection dialog. If you see this dialog, choose the appropriate option and click Continue.
With file(s) highlighted, select Legal Hold > Move To from the File pull-down list. You could also right-click with the file(s) highlighted and select Legal Hold > Move To from the right-click menu. That opens the File > Legal Hold > Move To dialog.
In the File > Legal Hold > Move To dialog, click Yes to go ahead and archive the file(s).
Files are then moved to Legal Hold folders under the profile groups with which those files are associated.
You can use the left-side navigation panel in Worldox to browse for files in Legal Hold storage. Assuming the Legal Hold feature is enabled at your site - and you have access to it - a Legal Hold folder appears for every profile group.
Click Profile Groups to access profile groups:
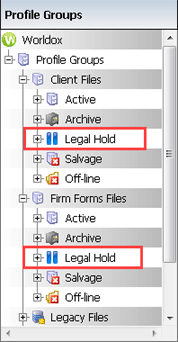
The Legal Hold branch has exactly the same structure as does the Active folder in that same profile group. Just click down to navigate through the Legal Hold folder as you would through the Active folder. Sub-folders are the same.
Stored files are also accessible through Direct Access. Be sure to select the Legal Hold option on the bottom of the List > Direct Access form.
Using Worldox Search:
To search for files stored in Legal Hold, use the Search What option on search forms:
Select Find from the Search pull-down menu in Worldox, or click Find in the toolbar. That opens the Search Templates dialog.
In the Search Templates dialog, select any search form which is not a view (as views run immediately, without opening the form itself), then click Select in the dialog toolbar. That opens the Find Files search form.
Set up the search however you want, specifying whatever search criteria are necessary.
Before running the search, click Search What. That opens the Search What dialog.
In the Search What dialog, leave Profile Groups selected in the What section, then tell Worldox which profile group folders to include in the search:
Check the Legal Hold box.
The Active box is pre-selected. Leave this checked if you want to also search in Active folders.
Click OK.
Back on the search form, click Search to go ahead and run the search.
Any stored files matching your search criteria are then displayed on the results worklist.
As long as stored files are still available in Legal Hold folders in Worldox, it is possible to restore them. Restoring a file means moving it back to the original, pre-storage Active folder location.
Legal Hold storage is a profile group-specific process, so you have three options for finding stored files to be restored:
• Browse profile group folders in the left-side navigation panel. A Legal Hold folder can appear under any profile group. (The Legal Hold feature has to be specifically enabled by Worldox Managers, so you may not see that folder for every profile group.)
Just find and open the Legal Hold folder you need to display a worklist of all items currently stored for that profile group.
• You can also use Direct Access to locate stored files. On the List > Direct Access form, click Profile Group to select the profile group. Then select the Legal Hold option at the bottom of the form and click OK.
With stored files located:
Highlight (select) the file(s) you want to restore in any active worklist.
Note: You can restore multiple files at once. If you select more than one, Worldox asks you to confirm your selection, in the Clarify Selection dialog. If you see this dialog, choose the appropriate option and click Continue.
With file(s) highlighted, select Archive > Restore from the File pull-down list. You could also right-click with the file(s) highlighted and select Legal Hold > Restore from the right-click menu. That opens the File > Legal Hold > Restore dialog.
In the File > Legal Hold > Restore dialog, click Yes to go ahead and restore the file(s).
Restored files are then moved back to the Active folders in which they were located before being stored.
Audit tracking is an essential part of the Legal Hold process, as the ability to validate document movements into and out of Legal Hold may be necessary to satisfy specific legal requirements.
The actions of moving files to Legal Hold or restoring them from Legal Hold are tracked automatically by Worldox. These two Legal Hold-related events are now available in GX3:
• Legal Hold add
• Legal Hold undo
The process of running Legal Hold audit queries and searches is no different than auditing any other file events. Just follow the instructions in Auditing Per File.
Note: This method is fast and easy. However, please be aware that single-file audit tracking only finds events for the selected file in its current location. If the file was moved, you will not see pre-move details. For complete file history, run an audit query. See Run an audit query.
1. Use the left-side navigation panel, search or other tools to find the worklist you need.
2. Highlight (select) the file for which you want to see history, then select File from the Audit pull-down menu. Or, right-click on the file and select Audit > File from the right-click menu.
That menu selection starts an audit query on the selected file. The query looks for all activity (excepting events Worldox was instructed to ignore, via Worldox preferences) on the selected file within a pre-set date range. The range is typically 60 days, but may be set otherwise by Managers and Administrators.
• If no file activity was found in that time frame, you see this message.
• Otherwise, results display in the Audit > File dialog:
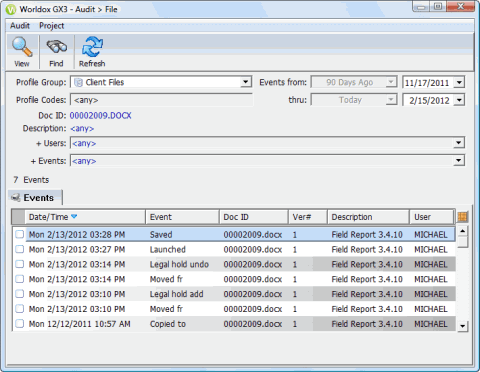
Next steps:
• View file events to get more information. See To View Audit Events.
• Print an audit trail report. See Print an audit trail report.
1. When search results display in the Audit > File or Audit > Search dialog, scan the list of found events.
2. Highlight
(select) the event listings you want to view, then click the View
icon ![]() in the toolbar. Or, to view a single event, just double-click that item.
in the toolbar. Or, to view a single event, just double-click that item.
Note: If you select more than one listing, Worldox asks you to confirm your selection in the Clarify Selection dialog. If you see this dialog, choose the appropriate option and click Continue.
That opens the Audit Record dialog, where you can view details about audited events.
You can enable the Legal Hold File Lock (F-lock) feature to lock a file from being changed and force a file to become a new version after any edits have been made.
• Once a file has been locked, you cannot unlock it and it becomes Read-only.
• It will be identified as a locked file and a hash value ensures that file contents will not change.
• If you want to edit the file after locking it, you must check it out, edit it, and check it back in. The only option should be to create a new version.
This feature is turned off by default, so you must activate it to use it. For details, see Activate the Legal Hold File Lock Feature.
1. Open the WORLDOX.INI file in the Worldox program folder on your network and add following key to the existing [Debug] section.
[Debug]
DayLight=1
By default, no users have access to this locking feature. You can enable it from WDADMIN.exe.
2. Launch WDADMIN.exe.
3. Select Security > Groups. Click the Features radio button.
4. Highlight Legal Hold and Set F-Lock.

5. Choose the user or users for whom you want to enable
this feature and select the Allow
![]() button.
button.
6. Save changes to Group Security and close WDADMIN.exe.
7. Re-load Worldox. From the File menu, you should now see the option to lock a file. (File > Legal Hold > F-Lock)
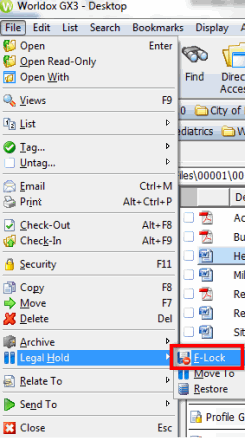
To lock a file using the Legal Hold > F-Lock option, do the following:
1. Select the file you want to lock.
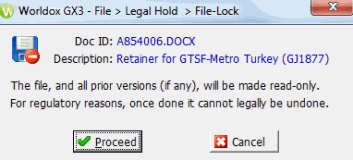
2. Right-click the file and select Legal Hold > F-Lock. The File > Legal Hold > File-Lock dialog appears. It informs you that the file and all prior versions (if any) will be made read-only. For regulatory reasons, once you have locked it and made it read-only, you cannot reverse the function.
3. Click Proceed.
4. After you have locked the file, an icon of a locked disk appears in #Ver column of Worldox file list.

5. If you open the file, it will be read-only, but you can move it, copy it, delete it or apply security settings to it.
6. If you select the Profile tab at the bottom of the file list, the Locked field displays the date the file was locked.
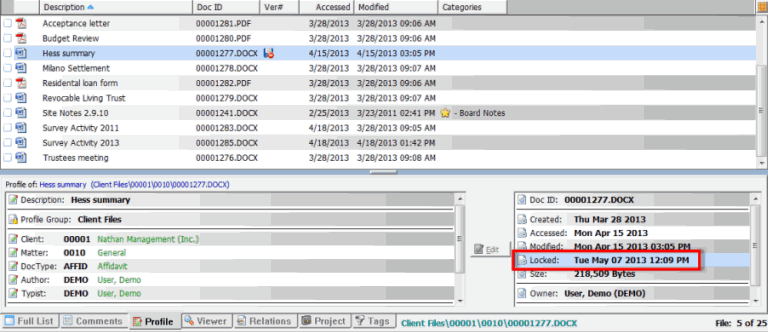
7. You can also select the hash value when the file is locked. If you click the hash value in the Profile tab, it will tell you if the hash value is different from when it was locked.

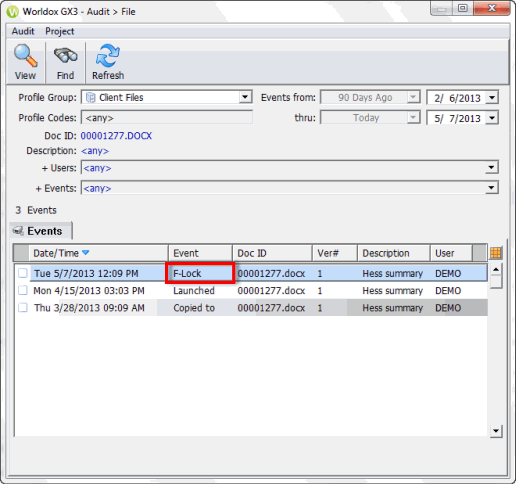
The audit trail for a locked file will reflect that the Legal Hold file has had the F-Lock feature applied to it.
1. In the file list, highlight the Legal Hold file you locked using the F-Lock option.
2. Select Audit > File.
3. The Audit File dialog displays F-Lock as the Event for the select Legal Hold file.
If you want to edit a Legal Hold file that has the F-Lock option applied to it, do the following:
1. In the file list, right-click the locked file.
2. Select File > Check Out > Local Mirror Folder.
3. Open the file in the mirrored location by double-clicking the file with Checked-Out status.
4. Edit the file as necessary.
5. Save changes to the file.
6. In the file list, select Check-In under the file.

7. The File > Check-In dialog appears. Select Add as a new version.

Note: If you select Discard local mirror copy and revert to original, your edits will not be saved.
8. The file is checked back into Worldox as a new version. The new version number appears next to the file in the Ver# column.
