• Overview
• Check in a new file created off-line
![]()
Use the check In feature to synchronize documents that you have checked out with their network (original file) counterparts.
• You can choose to overwrite the original file with the local checked-out copy.
• Or, you can choose to make the original file the previous version, saving the checked-out copy as the current, primary file.
• Or, simply discard the checked-out copy, restoring full access to the unchanged original.
To assist the check-in process, Worldox offers several ways to locate the files you have checked out.
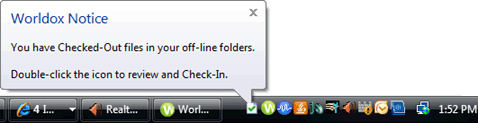
Tip: Worldox checks automatically for checked-out files each time it starts up on your workstation. If there are any checked-out files pending, you see a notification. Double click the notification window to see a list of checked-out files. |
You can check in documents that you have checked out as well as documents automatically marked as checked out by Worldox, as described in File synchronization. Documents can be checked in only when you are connected to the network.
Notes:
• To check a document back in, you must have access to its checked-out location. If, for instance, you have checked out files to a flash memory stick or other removable media, that device must be mounted in order for you to check those files back in.
• You cannot check in a file if you are not connected to the network drive where the original copy of the file is located.
![]()
Locate checked-out files.
You may know where that file is located. If so, open that list and look for the file (which will have a green checkmark indicating you have checked it out.)
Another way is to click Favorite
Files ![]() in the toolbar or choose Selected
Favorites from the List
pull-down menu. That opens the List >
Selected Favorites dialog. Double click the Checked
Out category, or check that box and click Select
in the dialog toolbar. That opens a worklist with all files you have
checked out. The file you want will be on that list.
in the toolbar or choose Selected
Favorites from the List
pull-down menu. That opens the List >
Selected Favorites dialog. Double click the Checked
Out category, or check that box and click Select
in the dialog toolbar. That opens a worklist with all files you have
checked out. The file you want will be on that list.
Finally, Worldox alerts you to files available for check-in on start-up, in a notification prompt over the Windows taskbar. Just click on that message to open a list of checked-out files.
Highlight (select) the checked-out file(s) you want to check in.
Note: You can check in multiple files at once. If you select more than one, Worldox asks you to confirm your selection, in the Clarify Selection dialog. If you see this dialog, choose the appropriate option and click Continue.
With file(s)
highlighted, select Check-In
from the File pull-down menu.
You could also click Check In ![]() in
the toolbar or right-click with the file highlighted and select Check-In from the right-click menu.
That opens the File > Check In... dialog.
in
the toolbar or right-click with the file highlighted and select Check-In from the right-click menu.
That opens the File > Check In... dialog.
Choose how you want to check in the file:
In the File > Check In ... dialog:
• Select Replace over on-line original to overwrite the original file, replacing it with the checked-out, local version.
• Select Add as a new version to retain the original file, adding the checked-out file as the current version.
• Select Discard local mirror copy and revert to original to retain the original file and discard the check-out, local version.
Tip: Be careful with choices in the File > Check In... dialog. Misunderstanding the last option can lead to a common check-in mistake. |
Click OK to go ahead and check in file(s). Then click OK to acknowledge the confirmation message.
![]()
Even if a document was created off line, you still have to check that file into Worldox.
Note: This assumes that you are still working in Worldox - creating, saving and changing files via Worldox - even without a network connection. Files added this way are saved to mirrored folders. When the network connection is restored, Worldox alerts you that there are files to check in. That list of files includes any new documents created while off-line.
Find the checked-out file.
If you are reconnecting to the network - and have created new files while off-line - Worldox alerts you to the presence of files to be checked in, as described here.
Select the file you want to check in,
then click Check In ![]() on the toolbar.
Or, select Check-In from
the File pull-down menu.
That opens the File > Check-In dialog,
this time with only one choice available.
on the toolbar.
Or, select Check-In from
the File pull-down menu.
That opens the File > Check-In dialog,
this time with only one choice available.
Click OK to go ahead and check in file. Then click OK to acknowledge the confirmation message.
Document numbering (Doc ID) of a new document saved off line
When a new document is created off line and saved, it receives a document number (Doc ID) unique to the PC on which the document was created on. When the new document is copied to the network, it will be automatically renamed with the next available Worldox global number.
![]()