Worldox GX3 brings several changes in toolbars. Buttons have names now. And most Worldox toolbars are fully customizable. You can move buttons, add or remove buttons - even change button names and graphics.
Tip: One more new feature - text "hints" for toolbar buttons - may be user-controllable as well. In this case, customization is done via the pull-down menu bar, not on the toolbar itself. |
• Restore original button icon
• Restore original toolbar buttons
![]()
Several factors affect how toolbars display:
• Screen resolution
• Monitor size
• Individual user access rights
The fact is, you may not see exactly the same toolbar as other Worldox users do - even other colleagues at your firm. Everything depends on how the application was set up at your site, and on the specific rights you have to various Worldox actions.
However many toolbar buttons you do see, one thing is true: If the Worldox application window is large enough, toolbar buttons appear with descriptive text labels. In this example, the Worldox window is maximized on a 19" monitor. The pull-down menu bar appearing above the toolbar is shown to give you a sense of scale.
Full-size

If you manually resize the window (one way being by clicking and dragging the right edge of the window frame to the left) Worldox quickly runs out of room to display all buttons and text labels. Narrow the window enough, and the entire toolbar shrinks down to fit. The text labels disappear:
Smaller toolbar, no names
![]()
If the Worldox window is re-sized further, there is another, even smaller toolbar size. Here the button icons themselves get smaller:
Even smaller toolbar
![]()
This is the next size down. There is even one smaller than this. But that is the limit, beyond which the Worldox toolbar cannot be further minimized.
So Worldox re-sizes toolbars to fit the available space. If you want
to see the largest size buttons - with descriptive text labels, click
the maximize icon ![]() at the upper right of the Worldox
window to maximize it.
at the upper right of the Worldox
window to maximize it.
![]()
If you still do not see the button names, try this:
• Change your screen resolution, via the Windows Control Panel. (The higher the resolution, the more screen content fits on-screen.)
• Remove unused buttons.
![]()
Right-click on the button you want to move:

Select Move Button Left or Move Button Right from the right-click menu.
That moves the button one place in the desired direction. Re-select that choice from the right-click menu as needed until the button is located where you want it.
![]()
To remove a button from the Worldox toolbar:
Right-click on the button you want to remove:
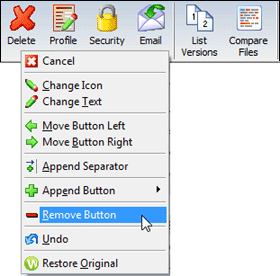
Select Remove Button from the right-click menu.
As soon as you do that, the button disappears from the toolbar.
To add a button back to the Worldox toolbar:
Right-click between any two buttons, or to the right of buttons on the toolbar:
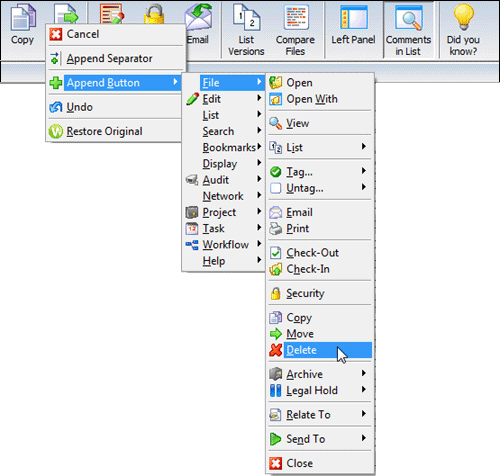
Select Append button from the right-click menu. That opens a second menu, corresponding to Worldox pull-down menu choices. Navigate through the cascading menus to find the button you want to add.
Click the found button choice to add it. In the example shown above, the user is adding the Delete button back to the toolbar.
As soon as you do that, the added button appears on the toolbar.
Tip: As you can see from the illustration above, there are many additional toolbar button choices available to you in Worldox GX3. Before you start rearranging the toolbar, give some thought to which buttons you really need. |
![]()
Tip : Each toolbar button has a corresponding pull-down menu command. So changing the text of a pull-down menu item also changes the corresponding toolbar button. And the reverse is true. Change a button name, and you'll see that menu command changes as well. |
Right-click on the button you want to rename:
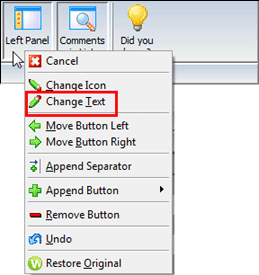
Select Change Text from the right-click menu. That opens the Change Text dialog.
In the Change Text dialog:
Change the button name.
Note how the current name (Button Text field) compares to the full pull-down menu listing text for this action, shown at the top of the dialog.
In this example, the name has not yet been changed; what appears in the Button Text field is the same as the last part of the menu phrase (highlighted below):

Now type the new name into the Button Text field, then click OK.
As the Change Text dialog closes, the changed button name appears in the toolbar.
![]()
Right-click on the button you want to change:
![]()
Select Change Icon from the right-click menu. That opens the Browse for Icon Windows dialog.
Note: If you have already changed the icon for the selected button, clicking Change Icon opens a dialog by that name instead. In the Change Icon dialog, select Change Current Icon and click OK. You then see the Browse for Icon dialog.
In the Browse for Icon dialog, find the icon you want to use for this toolbar button. Select it on the list, then click Open.
As the Browse for Icon dialog closes, the changed button icon appears in the toolbar.
![]()
Right-click on the button you want to restore:
![]()
Select Change Icon from the right-click menu. That opens the Change Icon dialog.
Restore the default (original) icon.
In the Change Icon dialog, note the two icons listed. The icon on the left is the original, default graphic, while the one on the right is the icon currently in use for this button:
![]()
Select Restore Default Icon and click OK.
As the Change Icon dialog closes, you again see the original icon on the toolbar button.
![]()
After removing one or more buttons, you may wish to return the toolbar to its original state - the way it was before you removed anything. Here is to do that:
Right-click between any two buttons, or to the right of buttons on the toolbar:
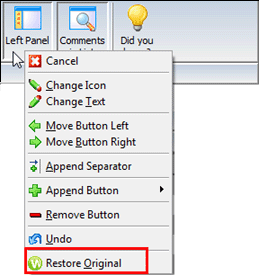
Select Restore Original from the right-click menu. That opens the Restore Original dialog, which tells you that this action cannot be redone:
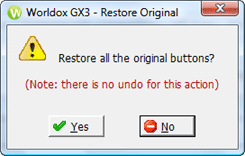
Click Yes to go ahead and restore all toolbar buttons originally available to you.
As the Restore Original dialog closes, you again see all original buttons on the toolbar.
![]()