Filter Lists with the Filters Document Tab
Related Topics
The Filters Document Tab document tab at the bottom of the main screen offers a visual way to see how information elements are represented in the visible file list, and gives you a way to filter based on those visual “tags”.
With the file list to be filtered visible, click the Filters  tab at the bottom of the screen to open the Filters document tab. (This is also sometimes referred to as the Tags tab.) Here is an example of how that tab looks:
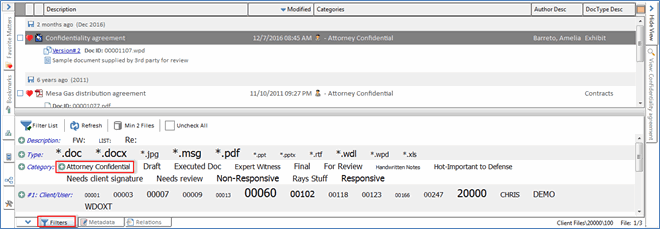
Tags are simply visual cues about what is in the list. Larger font sizes indicate more occurrences, down to the least number of hits indicated by items shown in the smallest font.
Tip: Some profile identifiers are numbered here; these correspond to numbered fields on profile forms.
The Filter List button controls when filtering happens. It is on (depressed) by default, meaning successive filter choices immediately filter the list above. Click this button once to turn it off, so multiple filters can be set before filtering.
Each line item (starting with a plus or minus symbol) represents a specific type of profile information.
To include files in any one category with the identifier(s) you are about to select, make sure the plus symbol is selected next to that category. (Click the symbol to change it.)
To exclude files in any one category with the identifier(s) you are about to select, make sure the minus symbol is selected next to that category. (Click the symbol to change it.)
In a category, select an item by which to filter the list.
Roll the mouse over the item you want to filter by. A highlight and checkbox appears:

Check the box to select that item. Set any additional filters necessary.
If the file list does not filter automatically, click Filter List  to filter.
The underlying file list then reloads to show only those files remaining after filtering.