The Tags document tab represents both a way to view how profile elements are "distributed" in the currently worklist, also an alternative for filtering worklists.
• Overview
• Use the Tags tab to filter worklists
• Setting a Tags tab preference
![]()
The Tags tab is a more visual way to understand the composition of worklists, also a useful alternative for filtering worklists. (The other approach for filtering lists is the Filter bar, using the Filter list or Set Filter dialog.)
"Visual" here means you can see at a glance how profile attributes are distributed (represented) on the worklist visible above the tab. That ability to quickly assess the composition of a worklist is by itself one of the biggest advantages of Tags filtering.
Tip: If you are not exactly sure what filtering does, here's a comparison of search, sorts and filters. |
The Tags tab offers the same choices available in the Set Filter dialog, plus some additional tools. However you filter worklists, the results are the same - smaller lists retaining only those items that most interest you.
Please remember: Filters are not the same as search. Filtering operates only on the worklist that is currently visible. To find new items and create new worklists, use Worldox search forms.
![]()
Use the left-side navigation panel, search or other tools to find the worklist you need.
Click the Tags
![]() or
or ![]() icon on the document tab row
at the bottom right of the Worldox window. That opens the Tags document tab for the worklist
above.
icon on the document tab row
at the bottom right of the Worldox window. That opens the Tags document tab for the worklist
above.
• Each
separate information category (starting with an add/plus sign ![]() symbol) represents one profile attribute. The specific items shown are
profile identifiers - field codes - shared by one or more files on the
currently-visible worklist. Which items appear in any one category - and
the profile categories themselves - will vary from worklist to worklist.
symbol) represents one profile attribute. The specific items shown are
profile identifiers - field codes - shared by one or more files on the
currently-visible worklist. Which items appear in any one category - and
the profile categories themselves - will vary from worklist to worklist.
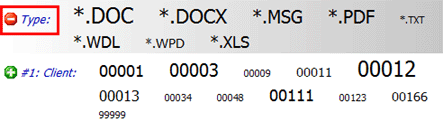
• In this Tags tab illustration, you see Type, Client, Matter, DocType and other information elements. These correspond to profile fields used to profile files on the worklist above.
Tip: Some attributes are numbered here; these correspond to numbered fields on profile forms. Here is a quick tour of one of the forms used to profile documents. The fields shown are the information elements listed on the Tags tab. |
• Within each profile category, note how type sizes vary. Here is what those size differences mean: The bigger the type, the more occurrences of this particular attribute are found on worklist document profiles - relative to the other attributes in that profile category. Again referring to the illustration:
Example 1: 00012 is the largest number in the Client line, meaning there are more files on the worklist associated with that client than any other.
Example 2: *.DOC is the largest identifier in DocType. The asterisk (*) is a wildcard, simply conveying that there is a document name in front of the suffix. Judging by the type size, there are more MS Word 93 documents on this worklist than any other single DocType.
Notes:
• Unless
you tell Worldox otherwise, any profile item associated with any file
appearing on the currently visible worklist appears on the Tags
tab. For large lists with many items to show, that could mean visual overload.
In that event, you can click the Spam
Min 2 Files ![]() icon to
suppress field codes or doc types with only one occurrence on the list.
icon to
suppress field codes or doc types with only one occurrence on the list.
• This minimum number is preference-controlled; you may have the ability to change that minimum-files preference.
• Within each profile category, each separate element is unique - meaning any one file will not share multiple elements within a category.
Example: In the Type category, no file will be both .DOC and .DOCX.
• To see the actual number of files with which an attribute is associated, just roll the mouse over that item:

A highlight appears, telling you what that attribute stands for, and how many files in the worklist share it. A checkbox also appears next to the highlighted item. You might select this if you are using the Tags tab not just to view worklist composition, but also to filter the worklist.
• The profile
information category itself is selectable. The add/plus sign ![]() symbol to the left of each category means
items in that category are represented on the filtered list. As you set
filters on the Tags tab, you
can click that add/plus sign
symbol to the left of each category means
items in that category are represented on the filtered list. As you set
filters on the Tags tab, you
can click that add/plus sign ![]() symbol to indicate you want selected items to be excluded in filtering.
The symbol changes to remove/minus
symbol to indicate you want selected items to be excluded in filtering.
The symbol changes to remove/minus ![]() , confirming
your selection.
, confirming
your selection.
![]()
Tip: See View worklist tags above for explanations of Tags tab symbols and filter categories. |
Use the left-side navigation panel, search or other tools to find the worklist you need.
Click the Profile
![]() or
or ![]() icon on the document tab row
at the bottom right of the Worldox window. That opens the Tags document tab for the worklist
above.
icon on the document tab row
at the bottom right of the Worldox window. That opens the Tags document tab for the worklist
above.
On the Tags document tab:
Note how profile attributes are represented on the worklist.
Each element shown on this tab represents profile attributes represented within the worklist above. Here are details on what Tags type sizes, icons mean.
Check the current filter "mode",
• The
Filter List ![]() is
the dynamic filtering control, controlling when filtering happens. It’s
on (depressed) by default, meaning successive filter choices set on this
tab are immediately reflected in the list above.
is
the dynamic filtering control, controlling when filtering happens. It’s
on (depressed) by default, meaning successive filter choices set on this
tab are immediately reflected in the list above.
• You can click this button once to turn it off; this allows multiple filters to be set or reset before the list is filtered.
Select an profile category to use in filtering.
Each separate line item (starting with an
add/plus sign ![]() or remove/minus
or remove/minus
![]() symbol) represents a specific type of
profile information.
symbol) represents a specific type of
profile information.
• To
include files
with the profile identifier(s) you are about to select, make sure the
plus ![]() symbol is visible. (Click the symbol
to change it as needed.)
symbol is visible. (Click the symbol
to change it as needed.)
• To
exclude files
with the profile identifier(s) you are about to select,make sure the minus
![]() symbol is visible. (Click the symbol
to change it as needed.)
symbol is visible. (Click the symbol
to change it as needed.)
In that category, select an item by which to filter the list.
Roll the mouse over the item you want to filter by. A highlight and checkbox appear, as in this example:
Check the box to select that item.
Go ahead and filter.
This step may in fact not be necessary. if the Filter List button is activated (depressed) on the toolbar, as in this example:
![]()
the worklist automatically filters and reload each time a new filter is set on the Tags tab.
If the worklist does not filter automatically, click Filter List.
Tip: You can save filter settings as part of a column template, so future lists from the same folder are filtered automatically. |
To return to the unfiltered list, check the Uncheck All box at the upper right of the Tags tab:
![]()
![]()
To change preference settings:
Select Preferences > Worldox from the Edit pull-down menu. That opens the Edit > Preferences > Worldox dialog, where preferences are organized into categories.
In the Edit > Preferences > Worldox dialog:
Note: This choice may not be available to you. Only Worldox Managers have access to the Everyone tab.
Click the File List Options category in the left-side pane to open file list preferences in the right-side pane.
Note the two columns in that right-side pane - Value and Default. Default lists the starting preference settings. Value shows the current value.
Look for the Tags Spam Filter preference. The default for this item should be "2", meaning only profile attributes associated with two or more files on a worklist will display on the Tags tab for that worklist.
To change that minimum number, double-click that listing to open the Change Value dialog.
In the Change Value dialog:
Reset the preference.
Type a new minimum number in the Set As field, then Click OK to make the change.
Changed preferences typically take effect immediately, as soon as the Change Value dialog closes. If you do not see the expected changes, select About Worldox from the Help pull-down menu. When the About dialog appears, press CTRL + D. Then click Close on the Debug dialog. That reloads Worldox configuration files.
![]()