![]()
Setting Up the WDInfo System Monitoring Utility
Setting Up the Site Default Domain for Email via WDInfo
The System Health Monitoring Process
Setting Up and Managing Notifications
Because email notifications can be scheduled via this application, WDInfo includes the same global email options setting dialog found in WDADMIN. Whether you will need to set global email options here depends not only on your specific email setup, but also on whether such options have already been set in WDADMIN as part of installing and/or administering Worldox.
If you have not yet set global email options, you can do so in the Email Properties dialog.
Use the Email Properties dialog to set the default domain for your site.
Notes:
• This dialog is identical to the WDADMIN Options > Email dialog.
• The SMPT Server/IP address entered here is used in conjunction with email addresses as entered in the individual WDADMIN user forms (Users > Add or Users > Edit dialogs).
![]()
1. Start WDInfo. One way is to go to the WORLDOX program folder and run WDINFO.EXE.
2. Click the
Worldox Health ![]() icon in the Worldox Health dialog toolbar. You can also select Worldox
Health from the File menu. The
Edit Health Notifications dialog appears.
icon in the Worldox Health dialog toolbar. You can also select Worldox
Health from the File menu. The
Edit Health Notifications dialog appears.
3. In the Edit
Health Notifications dialog, click the Email
Properties ![]() icon in the toolbar, or select Email
Properties from the File
menu. Either action opens the Email Properties dialog.
icon in the toolbar, or select Email
Properties from the File
menu. Either action opens the Email Properties dialog.
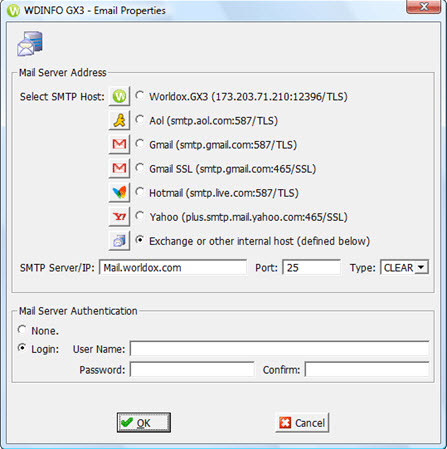
4. Select an SMTP Host for email:
• The Exchange or other internal host choice is your most likely choice. With this choice selected, you can then define your firm’s email domain below.
• The Worldox.GX3 choice is intended for temporary use only, one possible reason being that your exchange server is not yet ready. If you do use this service, please remember to come back later and change it.
5. If the Exchange or other internal host choice is the selected SMTP Host, type your firm’s email server name or IP address into the SMTP Server/IP field.
Note: When Worldox attempts to access mail accounts, it combines the individual user’s email address, as entered in the User Email tab, with the global server name or address as defined here.
6. Define mail server logon authentication (optional).
• If no authentication is used, select None.
• Otherwise, select Login, then fill in User Name and both password fields.
7. Click OK to save your entries and return to the Edit Health Notifications dialog.
WDInfo then sends an authorization email to test changes made.
![]()
WDInfo is simple to use. Just open the application to view current information on Worldox usage and indexer/database operation. You can leave WDInfo open on your desktop to see up-to-the-minute changes; the application screen refreshes often, at predetermined intervals.
The other mode of monitoring information is via scheduled updates. You can schedule regular update emails to one or more designated recipients in WDInfo, as another way to keep tabs on how the indexer and database(s) are functioning.
![]()
On the Worldox Health Screen
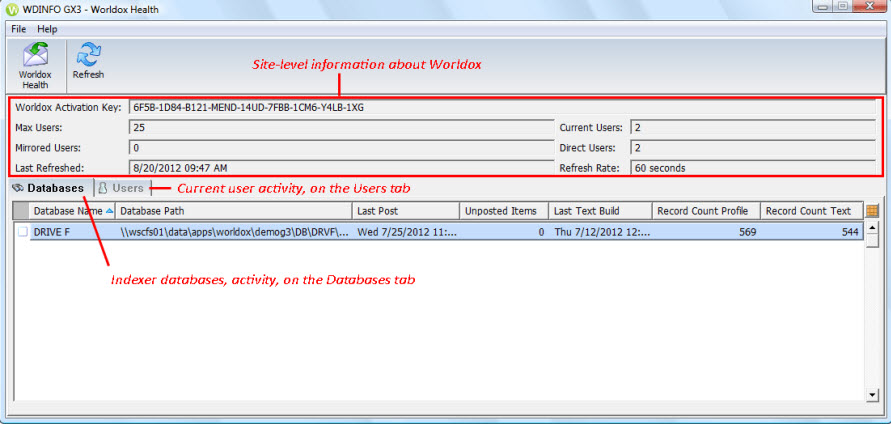
Three distinct categories of Worldox information are available in WDInfo, organized in tabs and the top part of the main application screen:
![]()
Field |
Description |
| Activation Key | Displays your Worldox activation key (license number). You can also display the license number from the Help > About command in Worldox, WDINDEX, and in WDADMIN, the Worldox Administration program. The activation key is included here for your convenience. |
| Max Users | Displays the maximum number of Worldox users your license allows. You can increase this number at any time by calling World Software at 1-800-962-6360 to purchase additional licenses |
| Current Users | Tells you how many Worldox users are currently logged on – mirrored and direct. |
| Mirrored Users | Tells you how many Worldox users are currently logged on – mirrored. |
|
Direct Users |
Tells you how many Worldox users are currently logged on directly from the network executable. The Worldox user code for each user is listed, along with a total count of users. Note: This is not the preferred way to run Worldox; it is slower than the mirror method, creates additional network traffic, and ties up files (by putting them “in use”) preventing on-line updates to the software. As a general rule, you do not want to have any WORLDOX.EXE users. An exception to this is if you have users running Worldox from a remote system such as Citrix® or Terminal Server. These users will load WORLDOX.EXE. |
|
Last Refreshed |
Date and time this WDInfo screen last refreshed. |
|
Refresh Rate |
How often this WDInfo screen refreshes automatically. |
![]()
Field |
Description |
Database Name |
Database name |
Database Path |
Database location |
Last Post |
Date |
Unposted Items |
Number of items not yet posted - pending indexing - to this database. |
Last Text Build |
Date of last text build. |
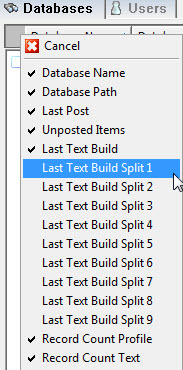
Last Text Build Split [1-9] |
Date of last text build – for each applicable split folder. The can be up to 9 such splits at very large databases. Note: These columns are not displayed by default. If your database(s) are split, please insert the appropriate columns here. To insert a column, right-click on the grey, blank space in the column header bar, then select one of the listed choices.
|
Record Count Profile |
Number of records in the profile database. |
Record Count Text |
Number of records in the text database. |
![]()
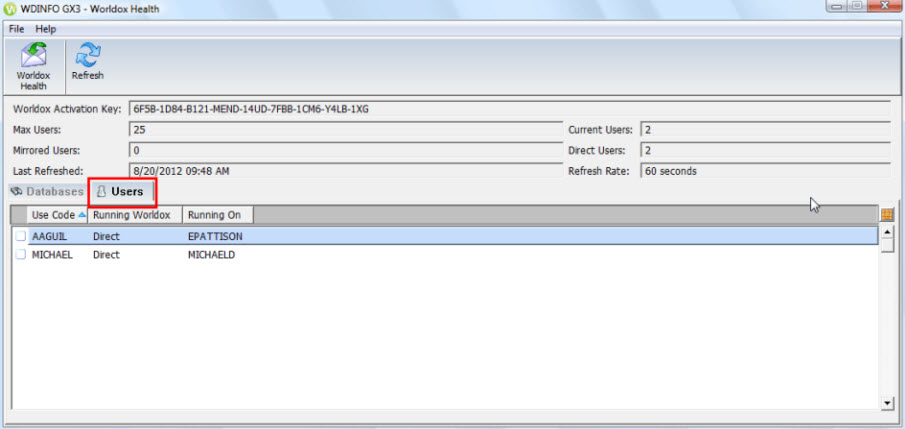
The Users tab on the Worldox Health screen is shown below:
Field |
Description |
Use Code |
Worldox user code of the user currently using Worldox. |
Running Worldox |
How the user is running Worldox - direct or mirrored. |
Running On |
Name of the PC on which the user is accessing Worldox. |
![]()
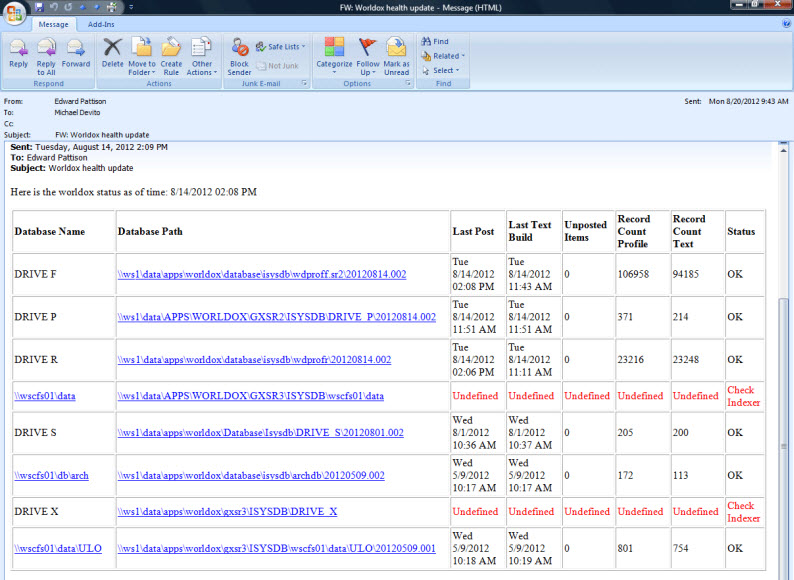
WDInfo status notification emails essentially repeat the information from the Databases tab in WDInfo. The one difference is that a Status column appears in notifications. Problems typically appear in red and carry the status designation of “Check Indexer”.
The following is an example of a status update email sent from a large site with multiple databases:
![]()
1. Start WDInfo. One way is to go to the WORLDOX program folder and run WDINFO.EXE.
2. Click the Worldox
Health ![]() icon in the Worldox
Health dialog's toolbar. You can also select Worldox Health from the File menu. Either action opens the
Edit Health Notifications dialog:
icon in the Worldox
Health dialog's toolbar. You can also select Worldox Health from the File menu. Either action opens the
Edit Health Notifications dialog:
3. In the Edit Health Notifications dialog, click Add
New Event  in the toolbar,
or select Add New event from the
File menu. The wdinfo Scheduler
dialog appears.
in the toolbar,
or select Add New event from the
File menu. The wdinfo Scheduler
dialog appears.
In the wdInfo Scheduler dialog:
4. Type the recipient’s email address in the TO: field. You can enter multiple addresses separated by semicolons.
5. Type any copy to email addresses (optional) in the CC: field. You can enter multiple addresses separated by semicolons.
6. Schedule the notification.
a. Check one or more day check boxes. These will be the days each week on which system health status notifications are emailed.
b. Use the three Time drop-down fields to set the time of day notification emails will be sent.
7. Click OK to save and schedule notifications.
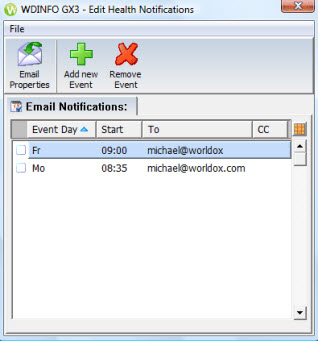
As the wdINFO Scheduler dialog closes, you see the new schedule item listed in the Edit Health Notifications dialog.
![]()
1. Start WDInfo. One way is to go to the WORLDOX program folder and run WDINFO.EXE.
2. Click the Worldox
Health ![]() icon in the Worldox
Health dialog's toolbar. You can also select Worldox Health from the File
menu. the Edit Health Notifications dialog appears.
icon in the Worldox
Health dialog's toolbar. You can also select Worldox Health from the File
menu. the Edit Health Notifications dialog appears.
3. In the Edit Health Notifications dialog, select
one or more listed email notifications, then click Remove
Event ![]() in the toolbar.
in the toolbar.
4. WDInfo then asks you to confirm your action in the Confirmation dialog:
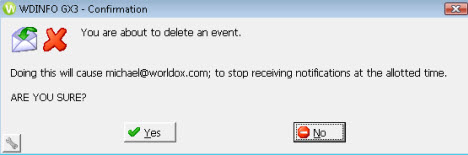
5. Click Yes to delete the scheduled event(s).
WDinfo removes event(s) selected and refreshes the list to show their absence.
![]()